Thursday, May 10, 2012

Orange Cranberry Scones

I saw the most interesting thing the other day. I was watching the news and they did a piece on moms who had emailed what they DON'T want for Mother's Day. They disdained things like matching body scent and lotion, chocolate, anything stuffed and fuzzy, and flowers(which horrified Tessa; who wouldn't want flowers???). I can see many a loving child getting dispirited looking at that list. After all, what 6-year-old doesn't get totally psyched over finding that perfectly cute fuzzy bear to give to Mom, with vague thoughts of taking care of it for her? Or seeing flowers that would look just beautiful in her mom's hair? I have to admit, I'm a sucker for anything that comes with a smile and a hug. I also have to admit, I've been smiling for the past few weeks knowing I was gonna have these scones for Mother's Day. Hailey tested this recipe, and my whole attitude towards scones was completely obliterated. "Scones are dry, tasteless, paperweights that don't belong in a pastry display." Sound familiar? Come on now, I know I'm not the first one to wonder how on earth scones ever became popular. These scones answered my question. Where to begin? First, the scent that fills the air: fresh, citrusey orange, with buttery undertones and slight notes of spice. The look: plump little packages, golden-brown, studded with plump ruby-red fruit and glazed with an invitingly creamy-looking lemon-orange glaze. The taste: everything you want a scone to be. First, you bite through the nicely-crisped outer crust, tasting the sweet, tart glaze, only to have your teeth sink into the completely tender, rich, moist interior. Chewy bursts of cranberry hit your palate, along with little zings of orange and creamy sweet pockets of white chocolate, and finally finishing with hints of aromatic spice. I really can't help but be excited, thinking about my little soldiers marching towards me with these little soldiers:
                                              
                                           CRANBERRY ORANGE SCONES
                                                       makes 10 (I double)

2 cups flour
10 tsp sugar, divided
1 Tbs orange zest
2 tsp baking powder
1/2 tsp salt
1/4 tsp baking soda
1/2 tsp ginger
few dashes of nutmeg
1/3 cup cold butter
1/2 cup craisins, soaked in 1/4 cup hot orange juice
1/2 cup white chocolate chips
1/4 cup half-and-half(I used cream, which is what I had)
1 egg
1 Tbs milk

GLAZE
1 cup powdered sugar
1 Tbs lemon juice
1 Tbs frozen orange juice concentrate
splash of orange extract

In mixing bowl, combine flour, 7 tsp of sugar, orange peel, baking powder, salt, baking soda, ginger and nutmeg. Cut in butter until it resembles coarse crumbs. In small bowl, combine craisins with orange juice, cream and egg. Add to flour mixture and stir until combined. On floured surface, pat into an 8-inch circle, and cut into 10-12 wedges, depending on how big you want them. Place on ungreased baking sheet. Brush with milk and sprinkle with remaining sugar. Bake at 400 degrees for 12-15 minutes, until lightly golden. Drizzle glaze over scones.

Tuesday, November 8, 2011

Hawaiian Sliders


I've been excited about winter ever since it started getting cold here. Yes, seriously. I think it may be a residual effect of living in Puerto Rico for 3 years, and opening Christmas presents in 80 degree weather. Don't get me wrong, I love summer, but I have a new appreciation for winter's benefits. Today, however, I felt a little tinge in my gut when my daughter watched a show that was set in the summertime. Swimming at the lake, nothing-to-do days, hot sun. And grilling. I miss grilling. Well, ok, technically I'm still using my grill, but not very often. And not after 5, thanks to that magic winter sun that disappears at the drop of a hat. My solution? Bake some sliders, baby! The Pioneer Woman (see here)made some big fat bacon sliders IN THE OVEN. So genius. I wanted to put a little more summer in mine though; hence the Hawaiian . These were so juicy and flavorful and delish! We really, really loved these, although my kids picked off the bacon for the most part. (There's a chance that could have been just so they could feed it to our dog Mojo.) So I'm leaving the bacon up to you. To wrap or not to wrap: that is the question.


HAWAIIAN SLIDERS

2 lbs ground beef(for my family of 6)(I used 80/20)
teriyaki sauce
Hawaiian sweet rolls
thinly sliced cheese
thinly sliced bacon(optional)

You'll want to season your ground beef in the morning, so the meat has time to absorb the flavors. Dump your meat in a bowl, and season with salt and pepper. (Please, you don't need to act so shocked that I'm not using Tony's.) Drizzle some of the teriyaki sauce over, however much you think will add a touch of sweetness to the meat. Now get your hands in there and mush it all up; you want to make sure the meat is well mixed. Cover with plastic and store in the fridge until you're ready to cook. 30 minutes or so before you're ready to roll out the sliders, take the bowl out of the fridge and let the meat come to room temp. Get out your broiler pan. Preheat your oven to 400. Now look at the size of one of the Hawaiian sweet rolls. Picture the slider in it. Then grab a handful of meat and roll into a large meatball that will fit the bun(I'd say fits comfortably in the palm of your hand). Don't worry, you won't be shot if the size isn't exactly right. Once you've rolled all the meat, now is the time to put the bacon on if you so choose. Cut each strip in half. Wrap one half around meat ball, trying to stretch it enough to touch on the other side. Then take another half slice of bacon and wrap the meat so that it intersects the first slice, making it look like a small Gaga-inspired ribbon-wrapped gift. Regardless of whether or not you used bacon, when the meat is ready to go, drizzle each ball with some teriyaki sauce. Slide the pan of tropical treats into the oven and bake for 20-30 minutes, until done to your liking. You need to know that if you wrap with bacon, the parts of the meat that the bacon covers will still look pink, even when it's done. I'm only mentioning this because that caused a bit of a ruckus with my kids, who seem to feel the need to protect themselves from food poisoning. You can use the firmness method--pushing down on one to determine how done it is--or you can go for the sure thing and just cut one open. Don't worry, it won't go to waste. When done, turn off the oven and pull them out. Top each one with a slice of cheese, and put back in the warm oven while you get out the rolls and condiments. Once your line is assembled, pull out those juicy darlings and add them to the lineup. Now, don't you feel your summer anguish depleting just the tiniest little bit? No? Have another slider.

Tuesday, October 25, 2011

German Chocolate Cake


Ok, yes, you totally caught me. I had to get creative with my picture taking since I didn't come to my picture-taking senses until half of this deep, dark, luscious, tender, moist, chocolaty, scrumptious, tantalizing, addicting, rich, intoxicating, wondershizzliciouslamdunkitykitycometome....


Ummm, I'm sorry, where was I? Oh yes, I didn't take my pics until we were halfway through the cake. And baby, what pictures....

BIRTHDAYS!!! What is it about birthdays that inspire us to reach beyond our culinary boundaries and swim in unknown waters? Am I alone in thinking the success of a birthday relies quite heavily on the magnificence of the cake? That we should be able to recall our birthdays by the cakes we celebrated them with? Now, I must stop now and issue a disclaimer, lest you think I am some kind of cake-decorating genius(unlike my friend Wendy, who most definitely IS a cake decorating genius), that I am NO cake decorator. Rather, I take pride in finding new flavors in cakes--new meaning new to my family. I have never given a second thought to German Chocolate cakes, as the few times I have tried them, the occasions have been forgettable. Well! Scott's birthday was this past Friday, and I was of course trying to think of some show-stopping concoction for his gâteau d'anniversaire. Really, German Chocolate should have reasonably had no place in my stream of consciousness. But I kept going back to the fact that my honey loves chocolate and coconut combined, and despite the fact that I had already made him a Mounds-inspired cake for a previous birthday, I was trying to figure out a twist on those flavors. I started thinking that there just HAD to be a reason for German Chocolate's popularity, and I wanted to FIND OUT WHAT IT WAS! (did I mention I'm a bit of a cooking challenge freak?) Let me tell you, I DID. I am even wanting to make it again, less than a week later, because I only got ONE PIECE!!! Yes, I've definitely had a seismic paradigm shift, and I completely understand the popularity of a GOOD German Chocolate cake. I wholeheartedly support the movement. If you do too, then tell me you're coming over for a visit so I can make this for you...


GERMAN CHOCOLATE CAKE
from David Lebovitz
(don't be intimidated by the length of the recipe: you can do it!)


For the cake:
2 oz bittersweet or semisweet chocolate, chopped
2 oz unsweetened chocolate, chopped
6 Tbs water
2 sticks unsalted butter, room temp
1 1/4 cup + 1/4 cup sugar
4 large eggs, separated
2 cups flour
1 tsp baking powder
1 tsp baking soda
1/2 tsp salt
1 cup buttermilk, room temp
1 tsp vanilla

For the filling:
1 cup heavy cream
1 cup sugar
3 large egg yolks
3 oz butter, cut in small pieces
1/2 tsp salt
1 cup pecans, toasted and finely chopped
1 1/3 cups unsweetened coconut, toasted

For the syrup:
1 cup water
3/4 cup sugar
2 Tbs dark rum(I used molasses)

For the chocolate icing:
8 oz bittersweet or semisweet chocolate, chopped
2 Tbs light corn syrup(didn't have, used molasses, worked fine)
1 1/2 oz unsalted butter
1 cup heavy cream

1. Butter 2 9-inch cake pans, then line the bottoms with rounds of parchment or wax paper. Preheat oven to 350 degrees.

2. Melt both chocolates together with the 6 Tbs of water. Use double-boiler or microwave. Stir until smooth, then set aside until room temp.

3. In mixer bowl, beat butter and 1 1/4 cup of the sugar until light and fluffy, about 5 min. Beat in melted chocolate, then the egg yolks, one at a time.

4. Sift together the flour, baking powder, baking soda, and salt.

5. Mix in half the dry ingredients into the creamed butter, then the buttermilk and the vanilla, then the rest of the dry ingredients.

6. In a separate bowl, beat the egg whites until they hold soft, droopy peaks. Beat in the 1/4 cup sugar until stiff.

7. Fold about 1/3 of the egg whites into the cake batter to lighten it, then fold in the rest of the whites until there's no visible trace of egg white.

8. Divide the batter into 2 prepared cake pans, smooth the tops, and bake for about 45 minutes, unto toothpick inserted in center comes out clean.

Cool cake layers completely.

While cakes are baking and cooling, make the filling, syrup and icing.

To make the filling:

1. Mix the cream, sugar and egg yolks in a medium saucepan. Put the 3 oz butter, salt, toasted coconut, and pecans in large bowl.

2. Heat the cream mixture and cook, stirring constantly(scraping the bottom as you stir)until the mixture begins to thicken and coats the spoon(170 degrees).

3. Pour the hot custard immediately into the pecan-coconut mix and stir until butter is melted. Cool to room temp(it will thicken.)

To make the syrup:
1. In small saucepan, heat the sugar and water until the sugar has melted. Remove from heat and stir in rum.

To make the icing:
1. Place the 8 oz of chocolate in a bowl with the corn syrup and 1 1/2 oz of butter.

2. Heat the cream until if just begins to boil. Remove from heat and pour over the chocolate. Let stand one minute, then stir until smooth. Let cool to room temp.

To assemble the cake:

Remove the cake layers from the pans and cut both cake layers in half horizontally, using a serrated bread knife. (Okay, so just to let you know, I didn't do this. I kept my cake to 2 layers, and didn't even feel one bit guilty.)

Set the first cake layer on the cake plate. Brush well with syrup. Spread 3/4 cup of the coconut filling over the cake layer, making sure to reach the edges. Set another cake layer on top. Repeat, using the syrup to brush each layer, then spreading 3/4 cup of the coconut filling over each layer, including the top.

Ice the sides with the chocolate icing, then pipe a decorative border of chocolate icing around the top, encircling the coconut topping.(Or, just push some extra up the sides and fiddle with it using your icing knife, like I did.)

(It may seem like a lot of chocolate icing, but use it all. Trust me. You won’t be sorry.)

Friday, October 14, 2011

My New Blender!


You like it? I don't.......I LOVE IT!!! In my house, we ride our blenders hard and put 'em to bed wet--well, broken, usually. I got the model that's a step down from this one in Puerto Rico, and that thing was a workhorse. It could power through anything I threw its way, and it lasted longer than any other blender I've ever owned. We finally chewed it up and spit it out this morning, and I simply couldn't face not having my Kitchenaid blender sitting on my countertop. SO, I got online this morning and researched what amount of dinero I was looking at parting with to replace it. I don't know how or why, but the stars were aligned this morning and I found a smokin' deal. One of my favorite places to look for Kitchenaid appliances is at their online outlet store, where they sell discontinued and refurbished models.(I am totally a refurbished fan, as my refurbished 7-year-old Pro 600 Series mixer will attest to.) Anyways....... back to star alignment. The Kitchenaid outlet is currently featuring as their weekly special the refurbished 5-Speed Artisan Series Blender with 56-oz Blend and Serve Pitcher for $54.99. AND, they are currently offering a flat-rate shipping fee of $2. AND, CouponCabin currently has a coupon for 10% off any Kitchenaid outlet store purchase. SO, the bottom line for my new blender, including tax and shipping? ******$55.33****** I am so happy!
Oh, and one of the best parts is you can choose your color! I just have to post this color option for my friend Zana, who loves turquoise more than anyone I know:


Hmmm, reading back through this post I'm noticing I'm in quite the old western sayings mood. Ok, don't worry, I am planning on doing an actual food post soon. It's not that I haven't been eating; I just need to remember to pick up my camera before I pick up my fork....

Monday, August 29, 2011

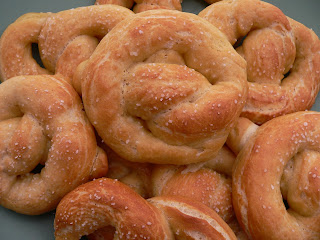
Soft Pretzels


I can't believe school starts for us tomorrow. We've had such a great summer that up until now I haven't really been ready to get back into the thick of things. Boy, I'm ready now sister!!! I guess when the time is right, the time is right. It also helps that I know what I'm gonna make for the kids' after-school snack. Hey, don't laugh! I say whatever gets me motivated to feel ready for homework, projects, library trips, sports, scheduling conflicts, morning wardrobe malfunctions, and deadlines, then so be it. Mmmmmm, warm, soft, salty, chewy pretzels. Yes, I believe I will carpe diem. Tomorrow.


SOFT PRETZELS
from Better Homes and Gardens New Cook Book
makes 20

4-4 1/2 cups flour
1 pkg dry yeast
1 1/2 cups milk
1/4 cup sugar
2 Tbs oil
1 tsp salt
2 Tbs salt
3 quarts boiling water
coarse salt

In your mixer, combine 1 1/2 cups flour and yeast. In saucepan, heat and stir milk, sugar, oil, and the 1 tsp salt till warm. Add to flour. Mix on low 30 seconds, scraping bowl. Beat on high for 3 minutes. Add enough of the remaining flour to make a moderately stiff dough that's smooth and not sticky. Shape into a ball, and drizzle with some oil, turning dough to coat. Cover and let rise until doubled, about an hour. Punch down. Turn out onto lightly floured surface and let rest 10 minutes. Cut into 20 pieces. Roll each piece into a rope 16 inches long. Shape the pretzels by crossing one end over the other twice, to form a circle. Lift twisted end over the top of the circle end and tuck the two tips under the circle. Place on greased baking sheets. Bake in 475 degree oven for 4 minutes. Remove and lower temperature to 350. Dissolve the 2 tablespoons salt in the boiling water. Lower pretzels, 3 or 4 at a time, into water. Boil 2 minutes, turning once. Remove with slotted spoon. Place back onto well-greased baking sheets. Sprinkle with coarse salt. Bake for about 20 minutes, until golden brown.

Thursday, August 25, 2011

Chewy Chocolate Cookies


You know, it's true, man does not live by bread alone. Despite the numbers here weighting the scale towards dinners, I really do love a good sweet. But it really does have to be good. I have no qualms admitting to being a total food snob when it comes to treats, because if ever you want your calories to count, it's when you're indulging. Who wants to say they blew their diet and their conscience on something that was just fitting the "sweet" bill? You want any guilt to be completely subdued by the utter glory of eating something truly divine. That being said, there are a lot of bad cookies out there. The kind you eat but wish you hadn't. It takes a good cookie to make me go in for more than one(hey, I'm not THAT snobby-of course I'll give all cookies a try!). I'm not going to go in to my whole rating system, but there are a lot of factors involved. These cookies passed my test. For me, chocolate cookies really have to have something that makes them special, because chocolate alone just doesn't do it for me. Texture: thin layer of crisp on the outside, like the top of creme brulee. Just enough to let you know you're breaking through to a chewy inside. Not doughy or pasty or airy or too dense of an inside, but classically chewy and tender. Taste: clean cocoa flavor, the kind that makes you think of how good hot chocolate smells. Chips: different kinds of chocolate, so they don't all blend into the cookie dough making for an anonymous chocolate flavor, but rather give you a chocolate disco in your mouth; the intense cocoa cookie, the creamy mildness of milk chocolate chips, the vanilla richness of white chips that intensify the other cocoa flavors in the cookie. Don't worry, you won't harbor any ill will towards these cookies once you realize you've hoovered through more than your fair share.


CHEWY CHOCOLATE COOKIES
from The Best of America's Test Kitchen 2010
makes 16 cookies

1/3 cup sugar, plus 1/2 cup for coating
1 1/2 cups flour
3/4 cup Dutch-processed cocoa powder
1/2 tsp baking soda
1/4 tsp plus 1/8 tsp salt
1/2 cup dark corn syrup
1 egg white
1 tsp vanilla
12 Tbs unsalted butter, soft
1/3 cup packed dark brown sugar
1 cup milk chocolate chips
1 cup white chocolate chips

Preheat oven to 375 degrees. Place 1/2 cup sugar in bowl. In separate bowl, whisk the flour, cocoa powder, baking soda, and salt. Whisk the corn syrup, egg white, and vanilla in separate bowl. In mixer, beat butter, brown sugar and remaining 1/3 cup sugar until fluffy. Beat in the corn syrup mixture. Reduce speed to low and add flour mixture and chocolate chips. Mix just until incorporated. Chill 30 minutes. Divide dough into 16 portions and roll into balls. Toss in sugar to coat. Place on greased baking sheets until cookies are just beginning to show cracks, 8-10 minutes. Rotate sheets halfway through baking time.

Wednesday, August 10, 2011

Shrimp, Bacon and Avocado Salad


Well, today is another big day for our family. My oldest daughter, Mailee, is 15 1/2 today, which means that when I am done posting this recipe, we are taking a trip to the DMV so that she can take the test for her permit. I know this is so cliche, but my! how time flies. My sister-in-law Carrie had her fifth baby yesterday (Happy Birthday Jack!), and looking at his picture reminded me how it seems like it was just yesterday I was bringing home my babies. Have you seen that commercial where the dad is holding the car keys, standing outside the car door and giving his daughter some last minute driving tips? Then it shows her daughter in the driver's seat, and she's about 4 years old. When he finally hands her the keys, she's really 16. I totally get it! I'm posting this recipe in honor of Mailee's big day. Why? Because she hates shrimp. It's ok, you don't have to see my reasoning. Let's just say there will be some laughing and hitting involved when she reads this. After all, I can't let her get too big for her britches yet....


SHRIMP, BACON AND AVOCADO SALAD
(adapted from Perry's Plate)

32-40 raw shrimp, tail on (I buy the bag of frozen, and defrost before using)
2 avocados, peeled, pitted and chunked(save 1/2 avocado for dressing)
1 lb bacon, chopped into pieces and cooked
a handful freshly shaved Parmesan
24 oz salad greens
grape tomatoes, halved

Grill the shrimp on medium heat. You can do this by skewering them, cooking them in a grill basket, or just putting them loose on the grill. They're done when they're pink and show nice grill marks. Toss them with the rest of the salad ingredients.

Ok, you have a few options for the dressing. I tried it with the Tangy Avocado Dressing that came with the recipe, but I was not happy with it. It was really thick and rich (not enough tang or flavor for me), which, combined with the avocado chunks, shrimp and cheese was just too much for me. I would strongly recommend dressing this with some salt, freshly ground pepper, olive oil and balsamic vinaigrette. BUT, here's the original dressing recipe:

Tangy Avocado Dressing

1/2 avocado from original 2
1 green onion, sliced
3 Tbs sour cream
3 Tbs mayo or plain yogurt
1 Tbs apple cider vinegar
1 Tbs agave nectar
1 tsp Dijon mustard
salt and pepper
Blend in food processor until smooth. Adjust seasonings.

Serves 8